Electronic Records Inventories
Contents
- Introduction
- Inventory template
- Creating an inventory
- Manual data entry
- Command line
- Open source tools
- Disk space analyzer applications
Introduction
In order to understand the electronic records held by your agency, it may be necessary to conduct some type of inventory or records assessment. This process can help identify what kinds of electronic records you have and the applicable General Records Schedule (GRS) or records Retention/Disposition Authorization (RDA). Records inventories can be used to determine what can be deleted, what should be retained by your agency, and what needs to be transferred to the State Archives. Inventories are also helpful if your agency is undertaking a drive cleanup process, in order to understand how your agency creates records and where they are stored.
If your agency implements an electronic records management system, you may be able to leverage the capabilities of that system to conduct a records assessment. The State Archives has an inventory template available for agencies.
Inventory template
This inventory template provides a basic framework for creating a records inventory. Its implementation can be adapted to meet your agency’s needs (fig. 1).
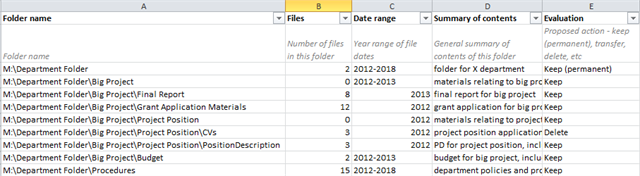
Figure 1
Example of electronic records inventory using this template
Download Electronic Records Inventory Template
Download the Microsoft Excel inventory template.
(Microsoft Excel, 12 KB)
Creating an inventory
There are several ways to populate an inventory with data (using either the template above or another custom framework). To create a list of the folders and/or files on a network drive, you can enter these manually, or you can use a number of automated tools. These are the methods that will be covered in this document:
- Manual data entry
- Command line
- Open source tools
- Disk space analyzer applications
Manual data entry

Figure 2
Windows Explorer folder properties dialog
A free, but labor-intensive, method for populating an inventory is manually entering data. This option is best for small drives or shared folders where only a top-level folder analysis is needed.
To determine the number of files or folders in a folder, right-click on a folder and select “Properties.” If you have Read permissions for the folder, you will be able to see the number of files and folders contained, the total size of the folder, and the owner of the folder.
Opening each folder and doing a quick scan of filenames and modified dates should allow you to broadly characterize folder contents. In the records inventory, you can enter summaries such as “event photos,” “personal files,” “meeting minutes and agendas,” etc. The purpose of this field in the inventory is to help you evaluate and assign a records schedule to the folder.
Command line
Windows has built-in tools to help you analyze your personal and shared network drives. By using Command Prompt, a command line interpreter that comes installed on Windows, you can create a report of a directory (or folder) structure from any given root location.
Method 1: Create a script
A script created in a text editor can be saved as a .cmd file, which is a “batch file” that automatically runs in the Windows Command Prompt. This script is saved in the target directory (the directory that you want to create a report for), and it can be run simply by double clicking the file.
Creating a script in a text editor requires less work and technical skill than typing a command directly into the Command Prompt (see Method 2: Use the Command Prompt). However, this method offers a little less control and customization than using the Command Prompt.

Figure 3
Script to create a report of all contents
These instructions will walk you through the process of creating scripts in a text editor for three different types of reports: top level folders only, folders and subfolders only, and all contents (folders, subfolders, and files).
Create a script in a text editor
Open a text editor, such as Notepad.
Copy and paste one of the following options into your text editor (fig. 3):
- Top level folders only: dir /A:D /O:N >"%cd%/DirectoryStructureTopFolders.txt"
- Folders and subfolders only: dir /A:D /O:N /S >"%cd%/DirectoryStructureNoFiles.txt"
- All contents: dir /S >"%cd%/DirectoryStructure.txt"

Figure 4
Run .cmd script
Save the file as a .cmd file (e.g. “DirectoryStructure.cmd”). Save it in the directory that you want to create a report for.
Generate a report
To create a report, double-click your saved .cmd file (fig. 4). Click “Run.” This will automatically create a report at the root of your directory. This report can be opened in any text editor.
Method 2: Use the Command Prompt
Unlike creating scripts in a text editor, using the Windows Command Prompt does not create extra script files at the root of a directory. This method offers a little more flexibility and customization, but it requires some comfort using the Command Prompt.
These instructions will walk you through the process of using the Windows Command Prompt to produce three different types of reports: top level folders only, folders and subfolders only, and all contents (folders, subfolders, and files).
Open Command Prompt
Go to the Start menu and search for “Command Prompt” or “cmd.exe”
Enter a command
Copy and paste one of the following options into the Command Prompt (fig. 5):
- Top level folders only: dir "[insert directory to search here]" /A:D /O:N >"[insert report directory here]\YourReportNameHere.txt"
- Folders and subfolders only: dir "[insert directory to search here]" /A:D /O:N /S >"[insert report directory here]\YourReportNameHere.txt"
- All contents: dir "[insert directory to search here]" /S >"[insert report directory here]\YourReportNameHere.txt"

Figure 5
Command to produce a top level folder report
For all of the options above:
- In place of [insert directory to search here], type the path of the directory you want to create a report for (see How to Get a Directory Path)
- In place of [insert report directory here], type the path of where you want to save the report (the directory must already exist in order to create a report in it)
- In place of YourReportNameHere.txt, type the name of the report
For example, to create a report of the top level folder structure for M:\Department Folder and save the report titled DepartmentFolderReport.txt in M:\Reports, you would type the following command:
dir "M:\Department Folder" /A:D /O:N >"M:\Reports\DocumentsDirectoryStructure.txt"

Figure 6
New prompt line in Command Prompt
Generate a report
Hit “Enter.” This will save a report with your chosen name in the specified location, which can be opened in any text editor.
The process is still running while the underscore line is flashing at the end of the command. The process is complete when a new prompt line appears (in fig. 6, the third line, starting with C:/>, is a new prompt).
Deciphering reports
Using any of the methods above will generate the same type of report, which lists directories and files. These reports contain a number of different elements (fig. 7):
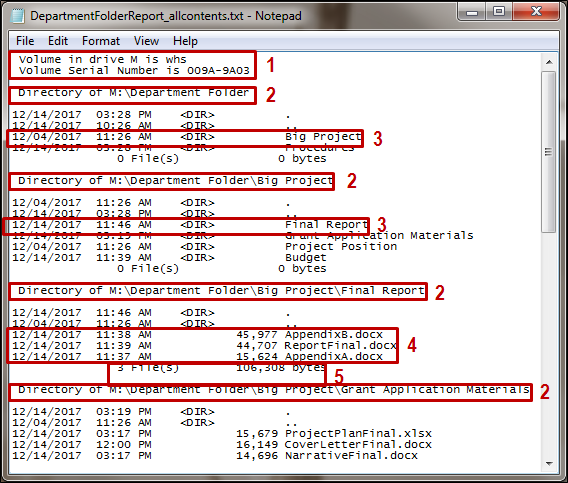
Figure 7
Command line directory report
- The volume label and volume serial number of the current drive
- List of directories (and subdirectories, depending on the command used)
- Subdirectories, with their last modified date and time, identified by <DIR>
- Files, with their last modified date and time and file size
- Total number of files in this directory, and the combined size of those files
These reports can be used in conjunction with the inventory template provided above to assess the content of a particular drive and assist in cleanup projects.

Figure 8
Directory path in the address bar of Windows Explorer
How to get a directory path
A path describes the location of a file or directory in a file system. On Windows, a path generally looks like a string of words separated by backslashes. To get a path, navigate to the directory in Windows Explorer. Click the folder icon in the address bar.
The address bar will now display the full path to the folder. You can copy and paste this as text into the Command Prompt, or any other application.
Open source tools
Organizations, such as the National Archives and Records Administration, have created open source tools to support their donors in their preparation of metadata and permanent electronic records for transfer. One such tool is FileLister
FileLister
Acknowledgment:
These instructions were derived in 2022 from National Archives and Records Administration (NARA) documentation found on their Electronic Records Accessioning Support Tools GitHub repository. Consult the GitHub repository for the latest versions of the tool and instructions.
About:
FileLister provides a list of all files in a folder and, if selected, any subfolders. The results include the file name, full file path, size in bytes, file extension, date modified, and SHA-256 Hash.
FileLister is a Java tool in a JAR file format. It does not require installation or administrative privileges to use, but it does require installation of Java on your computer to run. WHS does not advocate for a particular version of Java. Please consult with your IT department to explore your options before implementing any new software programs.
How to download:
FileLister is available in the National Archive and Record Administration’s (NARA) GitHub repository for Electronic Records Accessioning Support Tools, see here: https://github.com/usnationalarchives/Electronic-Records-Accessioning-Support-Tools. WHS was able to download the file using Google Chrome and Mozilla Firefox browsers.
- Make sure Java is installed on your computer. If not, you can download Java from a number of open software options, including but not limited to Amazon Corretto or RedHat build of OpenJDK
- Go to NARA’s Github repository. From the main page, the JAR file is located in the repository’s bin folder. Click on “bin.” You will be redirected to the folder.
- In the bin folder, click on the “FileLister.jar” file. You will be redirected to a download page.
- Click on the “Download” button. This should start the download process in your web browser.
- When the download completes either open and run the file by clicking on it in your web browser or navigating to your computer’s Downloads folder. Note: You may get a notification about this being an executable file. It is fine to click “Ok”.
- You should now be ready to use the program. The file may also be moved from the Download folder and saved in another location for future use.
How to use:
- Open the program using the “FileLister.jar” file.
- Once open, click on the Browse button to select the folder to be listed. Once the folder is selected click open.
- In the Directory Options section, ensure the “Check Subdirectories?” checkbox is selected.
- Next click on the “Run” button to start the process.
- When the process is complete, a pop-up will appear with the number of files.
- The results will appear in the body of the interface. Note: The top section shows the files listed and the values for each individual field. The bottom section will show the number of files for each file extension.
- Click the “Export” button and save the results as CSV file.
- After saving you can run the program again on another directory or close the program.
- Include the saved CSV file in your transfer.
Disk space analyzer applications
There are many disk space analyzer applications that generate customizable reports and file inventories. Included below is a list of free and proprietary applications that have been tested by Wisconsin Historical Society staff as of January 2018.
SpaceSniffer
- Free disk space analyzer for Windows
- Website: http://www.uderzo.it/main_products/space_sniffer/
FolderSizes
- Proprietary disk space analyzer for Windows
- Website: http://www.foldersizes.com/
TreeSize Professional
- Propriety disk space analyzer for Windows
- https://www.jam-software.de/treesize/?language=EN
 This guidance was derirved from documentation produced with support from the National Historical Publications & Records Commission (NHPRC). Learn more about the Wisconsin Historical Society's NHPRC Electronic Records grant.