Transfer Records to the State Archives with Exactly
Download Transfer Records to the State Archives with Exactly
Download the PDF version of this guidance document.
(PDF, 694 KB)
Contents
Introduction
The State Archives is implementing a new process for state agencies to transfer their electronic records to the archives, using a software application called Exactly. We care about the safety and integrity of your records, and we want to ensure that your digital materials remain intact during the transfer process. Exactly helps you package electronic records into BagIt “bags,” which are a digital preservation standard for transferring data. Exactly will then help you transfer your “bags” securely to the State Archives via an SFTP server. This new transfer process is not only more secure, but it will also save time and energy for both state agencies and the State Archives.
This document steps you through the process of setting up Exactly on your computer and using it to “bag” and transfer your records.

Set up Exactly
Download the appropriate version of Exactly here: https://www.weareavp.com/products/exactly/. If you need additional assistance, you can find the official Exactly User Guide here, with download and installation instructions. You may need to contact your IT department to install Exactly for you.
- State Archives staff will email you a customized Exactly template. This is an XML file that will configure the transfer settings in Exactly and pre-populate Exactly with information specific to your agency. Save the template in a place where you can access it again if you need to.
- Enlarge
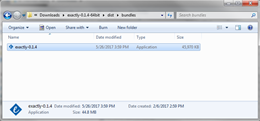
Figure 1
Exactly Windows Executable file
Install and open Exactly: Note that you must have Java installed on your computer in order to use Exactly. Download Java here: https://www.java.com/en/download/.
For Windows users, extract the Exactly zip package. Inside the main folder, go to dist \ bundles and find the Exactly Windows Executable (.exe) file (fig. 1). Copy and paste this file somewhere you can find it in the future. You might even want to pin it to your task bar when you open it.
Double click the file to install the application. Your computer may ask you if you are sure you want to run this file – you can agree to this.
In the Ready to Install dialog, click Install to continue with the installation.
Every time you open the file, your computer may ask you if you are sure you want to install Exactly. You can agree to this – it just means that it is going to temporarily install the files that it needs to run the program on your computer.
- Enlarge
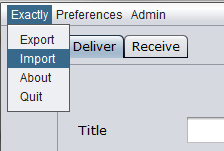
Figure 2
Import Exactly template
Import the XML template into Exactly: In the toolbar, select Exactly > Import (fig. 2).
Select the XML template.
The log window on the right shows you what you have successfully/unsuccessfully done. After you import the template, the log should tell you that the XML has successfully imported. You may clear this at any time by clicking clear log. The window below will tell you what your current template is.
Enlarge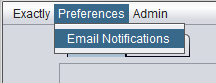
Figure 3
Set email notifications
- Enlarge
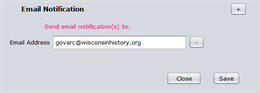
Figure 4
Email notification settings
Set up email notifications (this is who will get notifications about transfers): In the toolbar, select Preferences > Email Notifications (fig. 3)
The State Archives email address, [email protected] should already be preloaded here by the template. If you would like anyone else to receive email notifications about electronic records transfers, click “+” or “-” to add or delete email addresses. It is recommended that, at minimum, you also include your agency records officer in any records transfer notifications. Click Save (fig. 4).
Set up your email settings (this allows Exactly to send notification emails on your behalf): In the toolbar, select Admin > Email Settings
Provide smtp configuration settings to allow Exactly to send emails on your behalf. This is the same information you would find in your email application (i.e. Outlook) configuration settings, so you may be able to obtain the information by looking at your email application account settings. If not, the information needed can be obtained by contacting your IT administrator. You will need to obtain the settings for the Mail Server, User name, Password, Port, and Encryption Method supported by your server.
Check the Enable email notifications box to receive email notifications of your completed transfers.
Click Check and Save
If you have entered the information correctly, the log window should say that email settings have been saved successfully.
When the log window reports that email settings have been saved successfully, click Close
Exactly will now send email notifications on your behalf whenever you submit a transfer. You will also receive email notifications.
- Enlarge
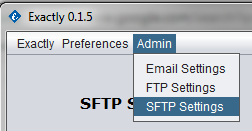
Figure 5
SFTP settings
Configure the SFTP settings (this will allow Exactly to make secure transfers over the SFTP server): In the toolbar, select Admin > SFTP Settings (fig. 5).
Enter the settings for Host, Port, Destination, Connect Using, Username, and Password provided by State Archives staff via email.
Click Validate and Save.
If you have entered the correct credentials, the log window should say that the SFTP settings have been validated and saved successfully. Click Close.
You are now ready to start transferring records with Exactly. For subsequent transfers, you should not have to reenter these settings – you will be able to skip directly to Prepare your Transfer.


Transfer Center
The Transfer Center in Exactly (the default view) has two tabs: Deliver and Receive. The Deliver tab is used by agencies to transfer records to the State Archives. The Receive tab is used by the State Archives to accept transfers (fig. 6). This guidance document will only cover the functions in the Deliver tab.
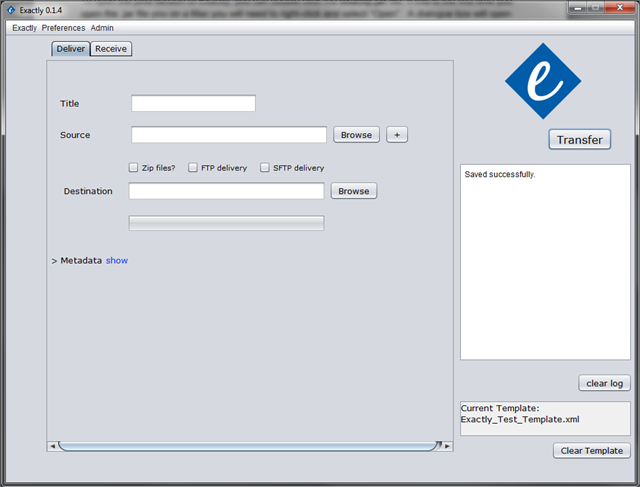
Figure 6
Exactly Transfer Center
Prepare your transfer
In this step, you will prepare your package (the records) for transfer to the State Archives. A package can be made up of multiple folders which are then bundled together with Exactly and sent to the State Archives. A package can be no larger than 200GB total. If you need to transfer a larger group of records, consider splitting them up and transferring multiple packages to the State Archives.
Creating a package involves giving your package a name, choosing the files and/or folders that you want to include in the package, and selecting the place where you want your transfer to go.
Open the Deliver tab and fill out the following fields:
- EnlargeTitle

Figure 7
Transfer title
(The title of the package to be transferred)
Enter the Transfer ID for this transfer (fig. 7).
The Transfer ID format is date_agencycode_transfernumber. Date should be yyyymmdd with no dashes or slashes. If transferring more than one package on a single day, indicate the number of this transfer (e.g. 20180124_245_1 is the first package transferred by the agency with the code 245 on January 24, 2018).
Use only underscores (no special characters, no spaces) in the Title.
- Enlarge

Figure 8
Transfer source
EnlargeSource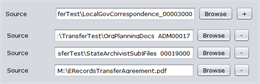
Figure 9
Transfer sources, including the Electronic Records Transfer Agreement
(The location of the record(s) that you want to transfer)
Click the Browse button to the right of the Source field.
Locate and select the folders that you want to transfer. Folders must be labeled by RDA.
If you would like to select multiple folders, you can add them by clicking “+” in the Deliver tab (fig. 8).
***Remember to include the completed Electronic Records Transfer Agreement in the transfer (fig. 9).
- EnlargeSFTP delivery

Figure 10
SFTP delivery
(Designate that the transfer will use the previously configured SFTP settings)
Check the SFTP delivery box. Do not check the other boxes in this row (fig. 10).
- EnlargeDestination

Figure 11
Transfer destination
(Where the local copy will be created)
Use the “Browse” button to find a location for the local copy of your transfer. Exactly will always create a local copy of the package first before attempting to deliver the package via SFTP, in case there is anything wrong with the server.
You may want to create a folder for local copies of transfers. Local copies can be deleted once you receive deletion approval from the State Archives (fig. 11).


Metadata

Figure 12
Exactly metadata fields
Metadata is “data about data” – it is information that describes content. Metadata will help State Archives staff understand the content of your files and the context of their creation. This will help State Archives staff process your records and make them publicly accessible.
In Exactly, each metadata item has a Label and a Value (fig. 12). The label field will contain a title for that metadata item. The value is filled in by the agency, or is pre-loaded by the template with information for each agency. Do not change the label names or delete metadata items with the “-” button. The information sent in these fields will be used by State Archives when arranging and importing your data into the digital repository.
Required fields
The table below lists the standard metadata fields provided in the XML template. Metadata needs to be supplied for each package. All fields are required.
You will need to enter the information in the white fields into Exactly.
The grey fields are pre-loaded in the template and should not need to be edited by the agency.
Field | Description |
Transfer ID | The transfer ID assigned by the State Archives (this is the same as the Title entered above). Format: date_agencycode_transfernumber. Date should be yyyymmdd with no dashes or slashes. If transferring more than one package on a single day, indicate the number of this transfer. |
Agency code | Numerical agency code (pre-loaded) |
Agency name | State agency name (pre-loaded) |
Contact name | Name of records officer/individual completing transfer |
Contact phone | Phone number of records officer/individual completing transfer |
Contact email | Email address of records officer/individual completing transfer |
Description | Brief narrative description of the contents of the transfer, including: - Which division/bureau/office created them - Records schedule(s) associated with these files - Any helpful information about the events/programs/processes represented in the files |
Date range | Date range of the contents of the transfer |
Arrangement | **The top-level folders in the transfer should be labeled with an RDA number** Include other information about how the files are arranged, i.e. - Organizational scheme (alphabetical, chronological) - Folder structure - Folder naming - Relationships between files/folders |
Document types | List the document types included in the transfer, e.g. - Reports - Images - Presentations - Emails - Databases - Budget spreadsheets |
Inventory? | Is an inventory spreadsheet/document included in the transfer (Yes/No)? How is it identified (e.g. filename of spreadsheet)? |
Transfer method | Exactly (pre-loaded) |
Fill in metadata fields
- Enlarge

Figure 13
Show metadata fields
Enlarge
Figure 14
Save metadata
If metadata fields are hidden, click show (fig. 13).
Fill in all value fields with your agency/package information. See the table above for guidance on completing these fields.
Make sure that pre-loaded value fields for your agency have been entered correctly (such as Agency Code and Agency Name)
Click Save to save your metadata (fig. 14). The log window should tell you that the metadata has been saved successfully


Transfer
- Enlarge
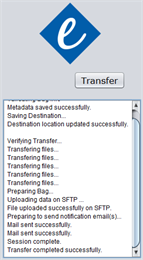
Figure 15
Log window confirming transfer
Once you have completed all required fields, click Transfer in the upper right hand corner. The log window will tell you whether or not your transfer has completed successfully (fig. 15).
Depending on the size of the files, this could take several minutes. Large transfers (>20GB) may take over an hour. You can use your computer as you usually do while waiting for the transfer to complete, but do not change any of the files being transferred or open the local package being created on your computer.
You will receive an email with the subject Exactly Digital Transfer, confirming your completed transfer. A copy of this notification email will also be sent to State Archives staff.
The body of this email should contain a record of the metadata entered for this package and the total package size. The email will also have an attached “manifest” for this transfer, which will list all the files transferred and their checksums.

Resources
Exactly software download and user guides: https://www.weareavp.com/products/exactly/
 This guidance document was produced with support from the National Historical Publications & Records Commission (NHPRC). Learn more about the Wisconsin Historical Society's NHPRC Electronic Records grant.