Common Problems with Wood Siding on Your Historic Building

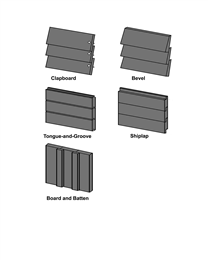
Here are five common types of wood siding found on historic buildings. Source: WHS - State Historic Preservation Office
If your historic house or building has wood siding, you will occasionally need to repair or replace individual wood boards or shingles. Before you make repair or replacement decisions, you should determine what type of wood siding is installed on your historic house or building. Many repair problems are common to all types of wood siding, but you may encounter some problems unique to the type of siding you have.
The siding on your house or building will be one or a combination of the types described below. All of these original types of wood siding are still available today.
Clapboard Siding
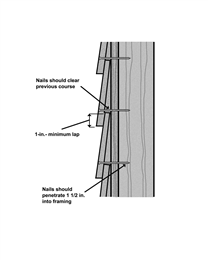
Clapboard siding is installed in horizontal courses (rows) from the bottom of your structure (the top of the foundation) and up. Each course is lapped between 1/2 and 1 inch over the top of the piece below it. The amount of each piece of siding that is exposed is called the exposure. Exposures are typically either 5 to 5-3/8 inches or 3 to 3-3/8 inches. Some historic houses have a very narrow exposure, closer to 2-1/2 inches.
Clapboard siding is available in two basic variations: beveled and flat/non-beveled. Clapboards are made from several different types of wood, including pine, fir, cedar and occasionally redwood or cypress. Pine was the most commonly used clapboard material before 1950.
If your house or building has clapboard siding, each piece of clapboard should be nailed to your structure about 1/2 inch up from the thicker, bottom butt edge. These nails should be driven in just above the thinner top edge of the piece below. Sometimes the overlap is more than a ½ inch, so the nail is driven through the thinner top edge of the piece below. The nails should be set between 8 and 12 inches apart.
The nail type and application varies depending on the year your structure was built:
- If your structure was built before 1900, the clapboards were applied with small-headed finish nails set below the surface about 1/8 inch and filled with glazing compound.
- If your structure was built after 1900, the clapboards were likely face-nailed with larger-headed box nails. The head of a face-nailed nail is set flush to the surface of a clapboard, not set below the surface, and then primed and painted over.
Your clapboard siding was applied on a wall section between vertical wood trim casings. For example, a section could be between a window casing and an outside corner casing, or between an inside corner casing and a door. If a siding piece was not long enough to reach from one casing trim to the other, the adjacent siding ends were butted together within the course. Occasionally, a clapboard course was started at a window or door casing and ended at an outside corner with no casing trim. In this case, the clapboards were either mitered together on the outside corners, or a metal outside corner piece was overlaid on the two joining pieces.
Drop Siding

Illustration of the proper way to install drop siding. Source: WHS - State Historic Preservation Office
Drop siding is fairly common on Wisconsin houses built between 1890 and 1950. Drop siding is made primarily of pine and occasionally fir, cedar, hemlock and rarely cypress. Each piece of drop siding is around 3/4 inch thick and has a deep cove running along its top edge. Like clapboard siding, drop siding is applied in horizontal courses, typically with an exposure of just over 5 inches.
Drop siding is one of these two types:
- One type has a groove on the bottom edge and a tongue on the top edge that are used to connect two pieces together.
- The other type has a lap joint on the bottom edge that laps over the top edge of the piece below it.
If your house or building has drop siding, each piece should be nailed 1/2 to 1 inch up from the bottom butt edge and again directly above this nail in the cove at the top. The nails should be set between 8 and 12 inches apart. The nail type and application varies depending on the year your structure was built:
- If your structure was built before 1900, the drop siding was applied with small-headed finish nails set below the surface about 1/8 inch and filled with glazing compound.
- If your structure was built after 1900, the drop siding was likely face-nailed with larger-headed box nails. The head of a face-nailed nail is set flush to the surface of a clapboard, not set below the surface, and then primed and painted over.
Your drop siding was applied on a wall section between vertical wood trim casings. For example, a section could be between a window casing and an outside corner casing, or between an inside corner casing and a door. If a piece of drop siding was not long enough to reach from one casing trim to the other, the adjacent siding ends were butted together along the course.
Board and Batten Siding
Board and batten sidings made up of wide boards that are applied vertically. The joint between two boards is overlaid with a smaller board called a batten. The larger siding boards are typically 3/4 to 1 inch thick and vary in width from 3 to 12 inches. Battens are 1/2 to 1 inch thick by 1 to 3 inches wide. Historically, board and batten siding was used on barns, carriage houses, outbuildings and many Gothic Revival styled houses.
Board and batten siding is made primarily of pine, occasionally of fir, cedar or hemlock, and rarely of cypress. On very early outbuildings and Gothic Revival houses, the wood was often cut on the land where the structure was built. The wood used on these structures could be any of a number of species depending on what trees were growing on the site.
Wood Shingle Siding
Wood shingle siding is a versatile building material with a long history in Wisconsin. Wood shingles are made of either pine or cedar and installed in horizontal courses. As with all horizontally laid siding, the first course of wood shingles is installed at the top of the foundation. Each subsequent course overlaps at least 2/3 or more of the shingle length in the preceding course.
The length of each shingle varies between 18 and 24 inches and often determines the exposure, generally between 5 and 7 inches. The standard approach was to apply triple coverage, so the exposure could never exceed 1/3 the length of a shingle. For example, a 24-inch shingle would have a 7-inch exposure, but an 18-inch shingle would not have an exposure over 5 ½ inches.
Wood shingles are sawn from the log and tapered, uniform in thickness and length. Each shingle can be cut to the exact same width or into random widths. The bottom butt edge can be left straight or cut in any number of patterns. This versatility allowed wood shingles to be used in many different ways. Certain ethnic groups, such as the Irish who began settling in Wisconsin in the 1840s, built log cabins and shingled the gable ends of the logs at the top of a sidewall with wood shingles. Thus, wood shingles were evident on the sidewalls of buildings as early as 1840 in Wisconsin.
Wood shingles became more prevalent around 1880 with the increasing popularity of the Queen Ann style. Many Queen Ann houses used wood shingles on sidewalls as decorative gables or horizontal banding, including fishscale shingles. The wood shingle trend continued until almost 1930 with various architectural styles, including the Shingle, Prairie School, Arts & Crafts, Craftsman and Colonial Revival styles. The Mansard roofs on early Second Empire style houses and buildings often included decoratively cut wood shingles.
Common Wood Siding Problems and Solutions
If your historic house or building has wood siding, you might face any of the following problems. Click the link on each subject to learn how to solve the problem.
| Common Problem | Learn More |
Horizontal cracks or splits along the grain lines in clapboard and drop siding. | To find out how to repair small splits with less than a 1/16 inch gap, click here. |
Horizontal splits wider than 1/16 inch, wood rot, or excessive cupping. | For replacement instructions, click here. |
Vertical cracks or splits along the grain lines in wood shingles and board and batten siding. | For repair instructions, click here. |
Severe weathering of the softer spring and summer wood in all siding types. This leaves the harder winter growth grain higher on the surface. | For information on painting this damage, click here. |
A washboard effect on the wood caused by sandblasting or high-pressure power washing. | Wood siding with this condition usually must be replaced. If the washboard effect is less than 1/16 inch in depth, you might be able to use an electric orbital sander to sand the siding back to a flat face, but it is a very labor-intensive task. |
Rot around the nails. Steel nails rust over time, and if the clapboard was face nailed, water can penetrate and cause rot and nail deterioration. Siding installed before 1900 usually had the nails set below the surface and filled with glazing compound. This method preserved the materials better than surface face nailing with a headed box nail. | For repair information, click here. |
Water penetrating under board and batten siding and settling at the bottom edge of the main boards, causing wood rot. | To eliminate most of the moisture, apply caulk at the top of the vertical siding pieces. For more information on repairing board and batten siding, click here. |
Insect damage from termites, carpenter ants or other insects. | Most siding with insect damage will need to be replaced. |
