Working with a Contractor to Replace the Roof on Your Historic House

Dane County. Prior to installing new asphalt shingles it is important to lay down an ice and water shield underlayment at the roof's perimeter. Source: WHS - State Historic Preservation Office
The roof on your historic house might be a significant character-defining feature. Many historic Wisconsin houses were built with unique roof shapes like steep gables, mansard roofs, turrets and towers. Houses were designed with these roof shapes because they quickly shed snow, ice and rain water off the roof. These roof shapes also make it possible to show off the shingling quite prominently. When the roof on your historic house needs to be replaced, you should hire a roofing contractor who will make certain that your newly shingled roof will be functional but also retain its historic character.
Roofs take more abuse than any other element of a house, so the historic roofing materials on your house were most likely replaced long ago. However, there are exceptions; some historic houses still have their original hard-surface roofing materials like clay tile, slate and metal.
Use Effective Roofing Practices
Your new roofing job will function better and last longer if you make certain your roofing contractor uses the following roofing methods and materials.
- Tear off all the old shingles down to the original decking. Your new shingles will last an additional five years if your roofer removes the old shingles first. If your roofer places the new shingles over the old shingles, they will place too much weight on your roof. The new shingles will also never lay flat, and water will erode the uneven new shingles faster than shingles that are laid on new decking. In addition, most building codes require that a roof have no more than two layers of shingles.
- Install one half-inch (actually 15/32 inch) plywood sheathing over the original deck. Make certain your roofer installs new plywood sheathing over your original deck to create a very smooth surface on which to apply the new shingles. Avoid using oriented strand board (OSB) for your new deck sheathing. OSB is a chip board that is prone to swelling and not as dimensionally stable as plywood.
- Nail all new sheathing directly to the rafters. Your roofer should nail the new plywood sheathing directly to your rafters. If your roofer allows an edge of the new sheathing to extend out over your rafters, it will cause a dip in your roof.
- Use 30-pound roofing felt. Make certain your roofer uses 30-pound roofing felt, or tar paper, under your new shingles. A 30-pound felt is heavier than the 15-pound felt used by many roofers.
- Install an ice and water shield material on the edges of your roof. Make certain your roofer installs an ice and water shield at least two feet beyond the exterior sidewalls and centered in all valleys.
- Install a metal drip edge on every roof edge. Make certain your roofer installs a metal drip edge on every roof edge after laying down the roofing felt (tar paper) and ice shield material.
- Install metal flashing instead of using tar or caulk. Make certain your roofer installs metal flashing instead of using tar or caulk. Flashing prevents water from entering your house around anything that sticks up from your roof, such as chimneys and vents. If designed properly, metal flashings should outlast your shingles, but tar and caulk will not.
- EnlargeInstall open metal valleys rather than weaving shingles into the valleys. A valley is where two roof pitches meet each other and form a channel to the eave and gutter. Historic wood, slate, ceramic tile and asphalt-shingled roofs always had open "W" valleys. These valleys encourage smooth water flow and good drainage. If your roofer weaves your new shingles into the valleys, the valleys will wear out long before your shingles.
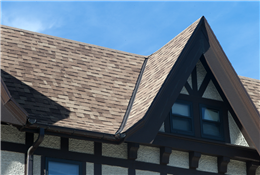
Dane County. An open valley roof with W flashing as seen here with asphalt shingles is an appropriate method for installing a new roof on an historic building. Source: Photographer Mark Fay

Understand Your Roofer’s Project Bid
Your roofer’s project bid will probably contain some unfamiliar terminology. Here are a few things to know about roofing projects:
- Roofers bid roofing jobs by the "square." A square is a 10-foot by 10-foot section of your roof, or 100 square feet.
- One square generally requires four bundles of asphalt shingles. A 300-lb architectural grade shingle is heavier than the standard three-tab shingle due to the heavier mat base. An architectural grade shingle will cost approximately 30% more than a standard 240-pound three-tab shingle, but it will last approximately 10 years longer.
- Shingles are rated for durability by weight. The weight rating of a shingle is actually the weight of all the shingles it takes to roof one square. A heavier square of shingles should be more durable.
- The pitch or steepness of your roof is determined by how much your roof rises within 12 vertical inches. Roof pitches are stated as 3-12, 6-12, 8-12, 12-12 etc. For example, a 4-12 roof pitch means that for every 12 inches measured horizontally, the vertical rise would be 4 inches.
- The warrantee for an asphalt-based shingle might range from 20 to 40 years, but you should expect your asphalt-based shingles, whether three-tab or architectural grade, will last about 20 years.
The information presented here is not intended to provide comprehensive technical advice or instructions on solving historic preservation issues. Any information contained or referenced is meant to provide a basic understanding of historic preservation practices. Read full disclaimer.