Evaluating the Interior Condition of Your Historic Building
Planning a historic house or building rehabilitation project is a complex process, so you might want to hire professionals to plan your project. But even if you intend to hire others to plan your project, you should understand the existing conditions of your house or building. The process of evaluating the condition of your main and upper floors will help you be an informed consumer. It will also show the professionals you hire that you are knowledgeable about your own building.
Gather Your Tools and Supplies
To properly evaluate the condition of your main and upper floors, you'll need the following tools and supplies:
- Notebook or a small hand-held tape/digital recorder to document what you see
- Camera with a zoom feature for close-ups
- Flathead screwdriver, awl or ice pick for poking into old wood and other materials
- Flashlight to see in dimly lit areas
- Pocket knife for scraping away dirt and paint
- Small magnet to determine whether metals are steel, lead, copper or brass
Conduct a Visual Assessment
Your visual assessment of the main and upper floors is primarily looking for “fit and finish” and energy-efficiency issues. The primary fit and finish concerns are your walls, ceilings, floors, bathrooms, kitchen and any original character-defining feature. Pay special attention to windows, exterior doors, insulation and locations of obvious air infiltration.
Take good notes and photos during your inspection. Creating a record of the basic existing conditions will help you communicate with the professionals you hire.
1. Look for signs of sagging and settling. Walk in the front entry of your house or building, or the entry to the upper floors. Observe the walls, ceiling and floors of the entry area and note whether the space feels straight or has areas that appear to be sagging or bulging. If your eye tells you an area does not seem level or plumb (flat or vertical), you are probably right. You might be observing a sag in the floor, ceiling or wall that has settled over time. Any potential structural issue may or may not need to be addressed during your rehabilitation project.
2. Inspect the original floors. Inspect the original flooring throughout your house or building. You may find the original surfaces are covered with non-original linoleum-type products, carpet or tile. In most cases, you can restore the underlying original floor.
- Pull up any floor heat registers or grills and count the number of layers on top of the original floor surface. Note the thickness of the original flooring.
- Find an out-of-the-way area in each room and pull up a small area of the carpet or other covering material. Before you pull up any linoleum-type flooring, spray it with some water in case it contains asbestos fibers. Note the visible condition of all the original floor surfaces.
3. Look for drop ceilings. The ceiling of many historic house and buildings has been covered with a grid-style drop ceiling system or other material. This was usually done either to hide aesthetic issues with the ceiling or mechanical systems, or to improve a perceived energy-efficiency problem.
If your building contains a drop ceiling, lift out several of the grid panels or remove other non-original materials to inspect the original ceiling. Note the condition of the original plaster, tin or wood ceiling. Also note the presence of wiring, plumbing or ductwork concealed by the drop ceiling.
4. Inspect the walls. The interior side of your exterior walls might be made of plaster or exposed masonry like brick, stone or concrete. Over time, the original walls may have been covered with drywall, wood paneling, wallpaper or other wall coverings.
- Remove an electrical wall outlet cover to determine whether the wall is original plaster or masonry, or overlaid with a newer material. Use the handle of your screwdriver or your knuckles to tap on the wall in several places, and listen to the sound your taps make. If the wall has a hollow sound, then the original plaster was installed over a wood-framed wall. If the sound is a solid thud, the plaster was applied directly over a masonry wall.
- Note the overall condition of all wall surfaces throughout the interior of your house or building. Look for bulging, cracks, loose plaster, water stains or deteriorating plaster.
5. Inspect the woodwork and trim. Your house or building may or may not have its original woodwork and trim. Observe whether the finish on your woodwork is natural or painted. Note the overall condition of your original woodwork on all levels of your building. Even if much of the original trim seems to be missing, you will likely be able to find some evidence of intact original pieces. Look inside closets, stairwells and other places that earlier remodelers missed.
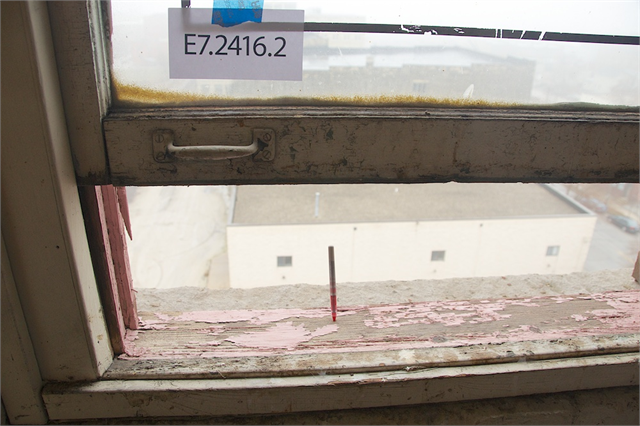
Milwaukee, Wisconsin. If you are able to stick a pencil into a wood window's sill, the wood is deteriorated and should be replaced with a new wood sill to match the original. Source: WHS - State Historic Preservation Office.
6. Inspect the windows and doors. Assess the overall condition of your windows and doors. Some houses and buildings are missing their original windows and doors, while others still have these important architectural features. Check a few operable and fixed windows on each floor. When you open an operable window, it should stay open. If a window does not stay open, the sash cord or old spring balance may be broken or missing.
- Look for broken glass or loose glazing compound used to hold the glass in the frame. Check the bottom of the window sashes for water stains. Water stains indicate that rain is leaking inside, or that interior condensation is a problem.
- Use a screwdriver, awl or ice pick to poke around the window sashes, the frames they sit in, and the interior sills (called stools) to check for rotted wood.
- Open and close all your exterior and interior doors. They should operate smoothly and shut snuggly. Observe whether the exterior doors have weatherstripping. Note any original hardware and its condition.
7. Inspect the kitchen and bathrooms. Assess the visual condition of all the bathrooms and kitchens in your house or building. Note the overall condition of the cabinets, fixtures, flooring and wall coverings. Some baths and kitchens might have original toilets, tubs, sinks or woodwork. Be sure to indicate in your notes any fixtures or surfaces you would like to keep.
The information presented here is not intended to provide comprehensive technical advice or instructions on solving historic preservation issues. Any information contained or referenced is meant to provide a basic understanding of historic preservation practices. Read full disclaimer.