Preserving Interior Plaster in Your Historic Building

Repaired plaster walls/ceiling - ready for paint. Source: Phil Thomason.
If you own a historic house or commercial building, there is a good chance that your building has plaster walls and ceilings. Plaster has been used for thousands of years. It was the most common interior finishing material used during the 19th and early 20th centuries. Plaster is a powder made primarily from lime or gypsum. When mixed with water, plaster forms a thick paste. This paste is applied either to brick walls or over thin strips of wood lath in frame buildings and on ceilings. The plaster is allowed to dry or “cure” for a period of time. The cured plaster can be painted or covered with wallpaper, stenciling or other decorative features.
Plaster became popular because it is a durable, fire-resistant finish that muffles sound. Plaster is an important part of your house or building’s historic character. Be aware that if you remove the original plaster in your house or building as part of a rehabilitation project, you could jeopardize your eligibility for federal or state tax credits.
Learn the History of Plaster Use
Until about 1900, all plaster walls and ceilings were done with lime-based plaster applied over wooden lath. The lime plaster was a mixture of lime, water and sand with animal hair used as a binder. After the mid-1850s, houses and buildings were constructed with thin, uniform strips of pine wood lath that were nailed to the interior stud walls and ceiling joists. A gap was left between each two adjacent wood lathes. The highest-quality plaster work was applied in three coats:
- Scratch coat. The first coat, called the scratch coat, was a 3/8-inch-thick layer troweled onto the wood lath. The plaster oozed into the gaps between the lath strips to create plaster “keys” that held the plaster on the wall. Scratches were raked onto the plaster surface to create a bond for the second coat.
- Brown coat. The second coat, called the brown coat, was a 3/8-inch-thick layer that created a flat surface on which to apply the final coat.
- Finishing coat. The third coat was a finer, 1/8-inch thick finishing layer.
In the late 1800's, metal screen types of lath and gypsum-based plaster came into use because these materials had a few advantages. Metal lath did not contract and expand as much as wood lath, and the mesh screen had more holes for the scratch coat to ooze through. The larger number of plaster-filled holes created better bonding keys. The gypsum-based plaster also dried more quickly than the lime-based plaster.
Beginning in the early 1900s and up to the 1960s, builders began to use rock lath in Wisconsin houses and buildings. Rock lath was a paper-faced, ½-inch-thick compressed gypsum board, generally 3 x 5 feet. Like the drywall used today, rock lath was nailed to the walls and ceilings and covered with two coats of lime- or gypsum-based plaster.
Plaster was typically applied to brick walls that were not intended to be exposed. The plaster was usually applied in two coats (a brown coat and a finishing coat) over walls that were made of imperfect bricks and had mortar joints that were rougher or more tooled than the exterior walls. In recent decades, some home and building owners have removed the plaster from their brick walls to expose the brick surfaces. However, the removal of the plaster eliminates the insulating properties of the plaster and reveals brick that was never intended to be viewed.
Repair Your Damaged Plaster

Small cracks in plaster are filled with a trowel. Source: WHS - State Historic Preservation Office.
The plaster walls and ceilings in your historic house or building may have cracks. These cracks form as a building settles or in areas where the plaster bulges as it pulls away from the lath. To repair these cracks, you must reunite the plaster with the strips of wood lath underneath. If you do not reattach the plaster to the lath, the cracks will reappear no matter how many times you patch over them. You can reattach plaster to your walls and ceilings by injecting an adhesive between the plaster and lath where the plaster keys have broken away over time.
You can choose from several methods to repair cracks and other damage to your plaster walls. Most of these methods can be do-it-yourself projects, but you may need to hire a professional if your plaster walls have extensive damage.
Choose one of the methods described below to repair your plaster, depending on the extent of the damage:
- Patch minor cracks. Fill minor cracks with siliconized latex or plaster filler. Make sure the product you choose has lime additives, which are best for older plaster walls. Fillers that contain lime remain flexible inside the crack and will not pull apart when they dry. When you have filled in a crack, sand and paint over the area to recreate a smooth wall finish.
TIP: If you have a larger or recurring crack in your plaster wall, you may need to bridge the crack with fiberglass mesh tape or a similar material. Apply three coats of filler compound. Allow the first coat of filler to dry, and then apply a second coat of filler to cover the tape and feather it at the edges. Apply a third coat to even out the surface, followed by a light sanding. Clean the area with a damp sponge, allow it to dry and remove any leftover plaster residue or dust.
- Repair deep or large cracks. If your wall has deep or large cracks, or is missing sections of plaster, remove all loose pieces. Thoroughly clean the exposed plaster and lath with a cleaning solution that is compatible with plaster. If the cracks occurred due to structural movement, repair the structural system of your house or building before you repair the cracked plaster. When you have made structural repairs, remove the plaster down to the lath on each side of the crack to a width of about six inches. Clean out the debris but leave the existing wood lath in place. Apply metal lath to the cleared area to prevent further cracking. Apply a base coat and a finish coat of new plaster or plaster compound to the repaired area.
- EnlargeRepair plaster that is pulled back from the wall. If your plaster has actually pulled away from the wall or ceiling, you should first determine how far the plaster has become unattached. If you push on the surface, you may be able to tell how much space there is between the plaster and lath. If the plaster keys are broken, do not force the plaster back into place between the lath strips; this pressure could cause more plaster to break away. You can purchase specially designed screws and washers to reattach the plaster to the lathe beneath. To strengthen the plaster keys and patch, attach expanded metal lath (diamond mesh) to the wood lath with tie wires or lath nails. Apply the plaster in three layers over the metal lath, lapping each new layer of plaster over the old plaster so that old and new are evenly joined. This stepping of layers will produce a strong, invisible patch. If you patch a plaster wall that is slightly wavy, contour the patch to conform to the irregularities of the existing work. A flat patch will stand out from the rest of the wall.
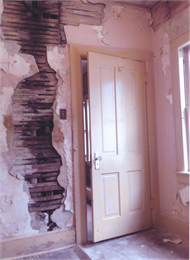
Milwaukee County. Plaster can break away from the wood lathe for many reasons, one of the biggest reasons being water infiltration. Source: WHS - State Historic Preservation Office.
- Repair a severely damaged or sagging plaster ceiling. If your plaster ceiling is too damaged to patch or sags significantly, you can keep your original ceiling and lath and plaster over it. This repair technique is particularly useful if you will not obscure any ornamental features by lowering your ceiling. You can cover the existing ceiling with wood furring strips, one to each joist, and fasten them to the old lath and plaster with screws. Nail expanded metal lath or gypsum board lath over the furring strips. Finally, apply a base coat and a finish coat of plaster.

Follow Best Practices
Follow these best practices to preserve your original plaster walls and ceilings:
- Preserve and maintain your original plaster surfaces. Maintain your plaster walls and ceilings to preserve the architectural integrity of your historic house or building. The texture of this historic finish conveys a craftsmanship that does not exist in contemporary manufactured wall treatments.
- Do not remove plaster to expose interior brick walls. Do not remove plaster from your brick walls. Plastered masonry wall surfaces have insulating values and are part of the energy-efficiency characteristics of your house or building. If your interior brick walls are covered with plaster, the bricks were never intended to be visible.
- Repair cracks and other damage to your plaster. Structural movement can cause stress cracks in plaster. You can fill in minor cracks with a joint compound, but larger cracks indicate structural problems that you must remedy first. Follow the instructions above to repair cracks and other damage to your plaster walls.
- Replace severely damaged plaster. If the plaster in your house or building has experienced rot damage from moisture, you must remove the rotted plaster and address the problem of water penetration before you replace the plaster. Be aware that you can be exposed to coal soot, lead-based paint and perhaps asbestos when you remove plaster, so you may want to hire a professional for this work. Workers must wear appropriate hazard masks.
The information presented here is not intended to provide comprehensive technical advice or instructions on solving historic preservation issues. Any information contained or referenced is meant to provide a basic understanding of historic preservation practices. Read full disclaimer.